-
Shop
- Advanced Technologies
- Best-Sellers
- Car Accessories
- Dating & Social Skills
- Digital Resources
- Budgeting & Saving
- Emotional Intelligence
- Entrepreneurship & Business Growth
- Financial Independence
- Financial Mindset & Psychology
- Goal Setting
- Leadership
- Mindfulness
- Motivation
- Online Business
- Positive Thinking
- Productivity
- Self Confidence
- Sleep Improvement
- Stress Management & Relaxation
- Yoga & Mind-Body Practices
- Education & Learning
- Family & Parenting
- Fashion
- Alexander McQueen
- Bags
- Bags & Wallets
- Balenciaga
- Belts
- Blazers
- Blouses & Shirts
- Bottega Veneta
- Bottoms
- Brunello Cucinelli
- Burberry
- Chanel
- Chloé
- Dior
- Dolce & Gabbana
- Dresses
- Etro
- Fendi
- Gucci
- Jacquemus
- Jewelry
- Jil Sander
- Keychains
- Kiton
- Luggage
- Luggage Bags
- Miu Miu
- Off-White
- Outerwear
- Prada
- Rick Owens
- Saint Laurent
- Shoes
- Socks & Tights
- The Row
- Tom Ford
- Valentino
- Valentino Garavani
- Versace
- Vivienne Westwood
- Fashion Accessories
- Furniture
- Gadgets
- Guess
- Headphones
- Health & Beauty
- Health & Wellness
- Home & Garden
- Home Supplies
- Kids & Babies
- Kitchen
- Kitchen Best-Sellers
- Lighting
- Patio, Lawn & Garden
- Personal Growth
- Pet Care
- Pet Supplies
- Pets
- Sport & Outdoors
- Super Deals
- TikTok Growth & Monetization Mastery
- Travel
- Wealth
- Popular
- Best deals
Tropical Leaf Wall Stickers: Peel-and-Stick Green Decor
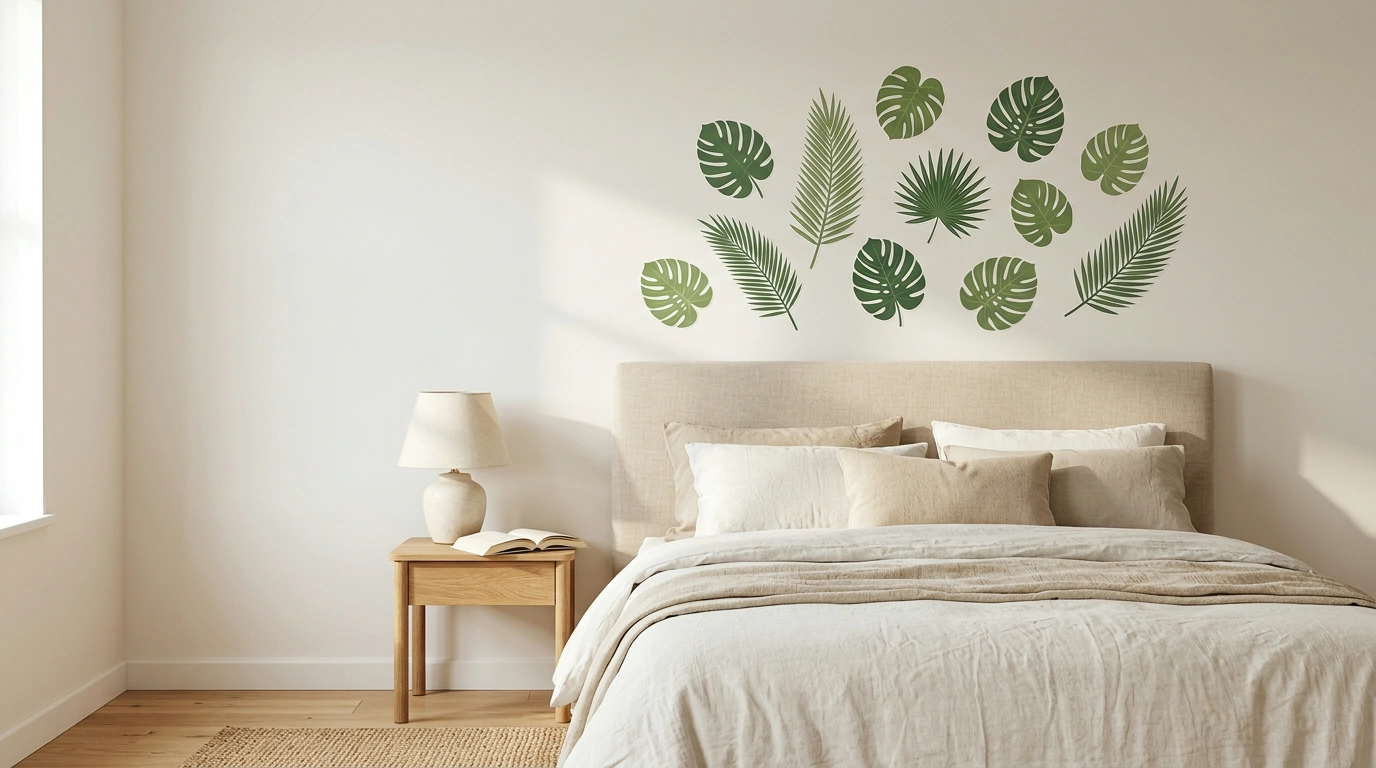
Tropical Green Plant Leaves Wall Stickers – Self-Adhesive Home Decor
Add a lush, botanical look to a room in minutes with peel-and-stick tropical leaf decals. These self-adhesive wall stickers are a low-commitment way to refresh bedrooms, living rooms, nurseries, dorms, or rental spaces—without paint, nails, or permanent changes. Whether you want a bold accent wall or a soft “hint of green” around furniture, leaf decals can help a space feel brighter, calmer, and more styled with very little mess.
What These Leaf Wall Stickers Bring to a Space
- Instant “greenery” effect for blank walls, corners, and awkward gaps around furniture.
- Works well for accent walls, behind a headboard, above a desk, or as a photo backdrop.
- Simple update for seasonal styling or events without long setup time.
- A renter-friendly option when applied to suitable, clean, dry surfaces.
If you want a fast refresh, start with Tropical Green Plant Leaves Wall Stickers – Self-Adhesive Home Decor. For DIYers who like to coordinate wall decor with painted accents or craft projects, Spray Shelter for Furniture & Craft Projects can help keep overspray contained when working on matching trays, planters, or small decor pieces.
Where They Look Best
- Bedroom: above the bed, around a mirror, or framing a nightstand wall area.
- Living room: behind a sofa or as a subtle border near shelves.
- Kids’ rooms: tropical theme corners or reading nooks (placed out of reach for toddlers).
- Home office: a calming green accent behind a chair for video calls.
- Bathrooms: only if walls stay dry and well-ventilated; avoid direct splash zones.
A helpful rule: place decals where they’ll be “seen with intention.” A cluster behind a lamp, along the edge of a gallery wall, or in a bare corner can look more designed than scattering small leaves randomly across the entire room.
Surface Check: What Helps Adhesion and Easy Removal
Decals perform best when the wall (or surface) is smooth, sealed, and fully dry. Adhesives are sensitive to dust, oils, and moisture—so a quick wipe-down and a little patience can make the difference between crisp edges and constant re-pressing.
- Best on smooth, sealed, clean walls (eggshell/satin paint after full cure), glass, metal, or sealed wood.
- Avoid freshly painted walls until paint is fully cured; uncured paint can peel.
- Textured walls can reduce contact area and lead to lifting at edges.
- Dust, oils, and moisture are the most common reasons decals fail—clean and dry the surface first.
- For delicate paint, test one small piece in an inconspicuous spot before placing the full layout.
Quick Surface Suitability Guide
| Surface type | How it typically performs | Practical tip |
|---|---|---|
| Smooth painted drywall (fully cured) | Strong hold and cleanest look | Wipe with a dry microfiber cloth; avoid greasy cleaners right before application |
| Gloss/semi-gloss paint | Usually holds well | Press firmly and smooth from center outward to avoid bubbles |
| Matte/flat paint | Can be more prone to lifting or paint pull on removal | Test a small decal first; remove slowly with gentle heat if needed |
| Textured walls (orange peel/heavy texture) | Edges may lift over time | Use larger decals rather than thin details; apply extra pressure along edges |
| Wallpaper | Unpredictable depending on wallpaper finish/adhesive | Test first; remove slowly to avoid peeling wallpaper layers |
| Tile/glass/metal | Very good adhesion on clean, dry surfaces | Clean with isopropyl alcohol and let dry completely |
For additional guidance on preparing surfaces and handling pressure-sensitive adhesives, refer to manufacturer best practices like those found on 3M. Good ventilation also helps keep interiors comfortable—especially in bathrooms and freshly cleaned rooms—see the U.S. EPA Indoor Air Quality resources.
Easy Placement Method (No Measuring Headache)
- Lay out the decals on the floor first to decide spacing and direction.
- Start from a reference point (top corner, headboard centerline, or shelf edge) and build outward.
- Apply slowly: peel a little backing at a time and smooth as you go.
- Use a soft cloth or plastic card to press out air bubbles from center to edge.
- For a more natural look, vary leaf angles and cluster sizes instead of making a perfect grid.
If you’re creating a “feature area” (behind a bed or sofa), stand back every few decals to check the overall balance. Small adjustments early are easier than trying to rework the entire layout at the end.
Care, Cleaning, and Keeping the Edges Flat
- Dust gently with a dry microfiber cloth; avoid abrasive scrubbers.
- If an edge lifts, press it back down firmly; warming slightly with a hair dryer can help it re-seat (use low heat and keep moving).
- Avoid placing decals near constant steam or heat sources (radiators, direct heater airflow) to reduce curling.
- If placed in kitchens, keep away from greasy cooking zones; airborne oil can weaken adhesion over time.
Tip for high-traffic areas: position decals a bit higher than hand level where people might brush the wall while walking by or moving furniture.
Removal and Repositioning Without Damage
Styling Ideas to Match Popular Decor Themes
FAQ
Will these wall stickers damage paint when removed?
Results depend on paint type and whether it fully cured before application. For best odds of clean removal, test one small decal first, peel slowly at a low angle, and use gentle heat if you feel resistance—especially on flat or older paint.
Do they stick to textured walls?
Light texture can work, but heavy texture often causes edge lifting because there’s less surface contact. Using larger decals, pressing firmly along edges, and testing one piece first helps confirm whether the hold is strong enough for your wall.
How do you apply them without bubbles or wrinkles?
Clean and fully dry the surface, then peel the backing gradually while smoothing from the center outward with a soft cloth or card. If a crease starts, lift and reposition right away before the adhesive fully sets.
Recommended for you

Compare LEM, Hakka & Weston Sausage Stuffers
Sep 23, 2026











Leave a comment